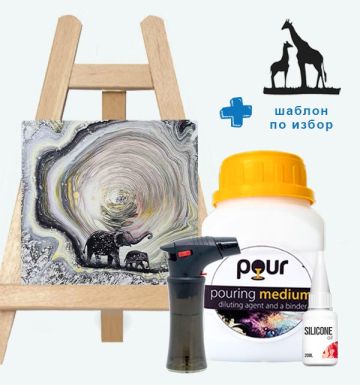
CREATIVE KIT
for creating a painting using fluid technique
(Acrylic Pouring)
CREATIVE KIT
for creating a painting using fluid technique
(Acrylic Pouring)
Instructions for use
1. Preparation
· Protect the work surface with the nylon mat, spread it on your work surface. For extra security, place cardboard or paper under the nylon to prevent staining the table.
· Prepare cups for each color you will use.
· Place the canvas on 4 cups so that the paint flows freely.
· Put on the apron and protective gloves - acrylic paints can leave stains.
· Work in a well-ventilated room and make sure there is no draft to avoid dust or hair getting on the wet paint.
2. The magic is in the consistency!
Proper mixing of acrylic paints is essential for successful pouring. The goal is to achieve a smooth, fluid consistency that spreads easily on the canvas, without being too thick or watery. The consistency of the paint should be similar to syrup, melted honey, but it should not flow like water.
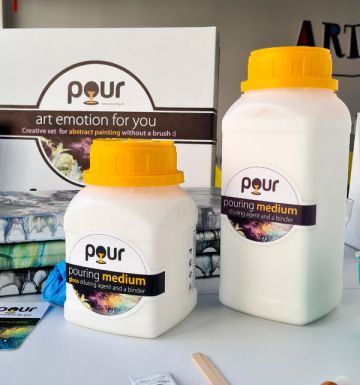
Mixing ratios
Mixing ratio for white base
· 1 part acrylic paint (75 ml)
· 5 parts pouring medium (350-400 ml)
Mixing ratio for light colors (white, yellow, orange, ochre, light blue, etc.)
· 1 part acrylic paint (12 ml)
· 2-3 parts pouring medium (30-40 ml)
Mixing ratio for more active colors (red, green, blue, brown and black)
· 1 part acrylic paint (12 ml)
· 4-5 parts pouring medium (40-50 ml)
3. Mixing the colors
1. Pour the desired color of acrylic paint into a plastic cup.
2. Add pouring medium according to the selected ratio (See mixing ratios).
3. Stir vigorously with a wooden stirrer until the mixture is smooth and homogeneous.
4. Test the consistency – the paint should flow smoothly from the spatula, without leaving too thick streaks.
5. If the paint is too thick, add a little water – a few drops at a time and mix again.
4. Test the consistency
To check if the paint is the perfect texture, use the following methods:
· Dip the stirrer into the paint and lift it up.
· If the paint flows in a smooth, continuous stream (like liquid honey), then it is the right consistency and is ready to use.
· If it falls apart – then it is not mixed well.
· If it sits on the stirrer and does not want to flow, then the mixture is too thick (add a little more water).
· If it flows too quickly – too thin (add a little more paint).
5. Adding silicone oil (optional)
If you want to achieve a “cell” effect, add silicone oil to some of the colors:
· Add 3-4 drops of silicone oil to the paint cup.
· Stir gently, but not too much - this will preserve the “cell” effect.
· After pouring, go over with hot air (lighter or hair dryer with a weak warm stream) to activate the cells.
Tip: Do not add silicone to all colors to preserve the contrast between the cells and the background.
6. Storing mixed paints
If you have unused paint left:
· Remove the stirrers from the cups and cover them with foil so that they do not dry out.
· Stir again before the next use.
Now you are ready to pour the paint!
✨ Success in creating beautiful paintings ✨
Pouring paint (Pouring techniques)
The choice of technique is important for the final result of your painting. You can follow a specific technique or experiment by combining different approaches.
✨ Cup Inversion – Dramatic Color Explosions
✅ Description: Pouring paints into a cup, inverting it onto the canvas and releasing the contents for unexpected and impressive effects.
Steps:
1. Pour a puddle of white base onto the canvas (with a diameter of about 10 cm and a layer thickness of 1-2 mm)
2. Pour different colors of paint into one cup, creating layers.
3. Quickly invert the cup onto the puddle of white base so that it remains with the opening down, and leave for a few seconds for the paint to spread.
4. Slowly lift the cup – the paints will start to spill and create interesting shapes.
5. Slightly tilt the canvas to spread the paint evenly.
Tip: If you want to create more “cells”, blow warm air from a lighter or a hot hair dryer over the surface of the paint.
✨ Multicolored Puddles – Layering Colors
✅ Description: Pouring the paints in layers directly onto the canvas to create concentric circles or dynamic effects.
Steps:
1. Cover the canvas with a thin layer of white base. (Layer thickness 1-2 mm)
2. Start by pouring the first color of paint into two or three small puddles on the canvas.
3. On top of it, in the same puddles, pour the next color.
4. Repeat with the remaining colors – they will start to spill out in concentric circles.
5. Inflate the balloon. Gently press the balloon onto the colored puddles and carefully lift it, this will make an imprint.
6. Repeat in different places.
7. Clean the balloon frequently to get prints with fresher colors.
for creating a painting using fluid technique
(Acrylic Pouring)
Instructions for use
1. Preparation
· Protect the work surface with the nylon mat, spread it on your work surface. For extra security, place cardboard or paper under the nylon to prevent staining the table.
· Prepare cups for each color you will use.
· Place the canvas on 4 cups so that the paint flows freely.
· Put on the apron and protective gloves - acrylic paints can leave stains.
· Work in a well-ventilated room and make sure there is no draft to avoid dust or hair getting on the wet paint.
2. The magic is in the consistency!
Proper mixing of acrylic paints is essential for successful pouring. The goal is to achieve a smooth, fluid consistency that spreads easily on the canvas, without being too thick or watery. The consistency of the paint should be similar to syrup, melted honey, but it should not flow like water.
Mixing ratios
Mixing ratio for white base
· 1 part acrylic paint (75 ml)
· 5 parts pouring medium (350-400 ml)
Mixing ratio for light colors (white, yellow, orange, ochre, light blue, etc.)
· 1 part acrylic paint (12 ml)
· 2-3 parts pouring medium (30-40 ml)
Mixing ratio for more active colors (red, green, blue, brown and black)
· 1 part acrylic paint (12 ml)
· 4-5 parts pouring medium (40-50 ml)
3. Mixing the colors
1. Pour the desired color of acrylic paint into a plastic cup.
2. Add pouring medium according to the selected ratio (See mixing ratios).
3. Stir vigorously with a wooden stirrer until the mixture is smooth and homogeneous.
4. Test the consistency – the paint should flow smoothly from the spatula, without leaving too thick streaks.
5. If the paint is too thick, add a little water – a few drops at a time and mix again.
4. Test the consistency
To check if the paint is the perfect texture, use the following methods:
· Dip the stirrer into the paint and lift it up.
· If the paint flows in a smooth, continuous stream (like liquid honey), then it is the right consistency and is ready to use.
· If it falls apart – then it is not mixed well.
· If it sits on the stirrer and does not want to flow, then the mixture is too thick (add a little more water).
· If it flows too quickly – too thin (add a little more paint).
5. Adding silicone oil (optional)
If you want to achieve a “cell” effect, add silicone oil to some of the colors:
· Add 3-4 drops of silicone oil to the paint cup.
· Stir gently, but not too much - this will preserve the “cell” effect.
· After pouring, go over with hot air (lighter or hair dryer with a weak warm stream) to activate the cells.
Tip: Do not add silicone to all colors to preserve the contrast between the cells and the background.
6. Storing mixed paints
If you have unused paint left:
· Remove the stirrers from the cups and cover them with foil so that they do not dry out.
· Stir again before the next use.
Now you are ready to pour the paint!
✨ Success in creating beautiful paintings ✨
Pouring paint (Pouring techniques)
The choice of technique is important for the final result of your painting. You can follow a specific technique or experiment by combining different approaches.
✨ Cup Inversion – Dramatic Color Explosions
✅ Description: Pouring paints into a cup, inverting it onto the canvas and releasing the contents for unexpected and impressive effects.
Steps:
1. Pour a puddle of white base onto the canvas (with a diameter of about 10 cm and a layer thickness of 1-2 mm)
2. Pour different colors of paint into one cup, creating layers.
3. Quickly invert the cup onto the puddle of white base so that it remains with the opening down, and leave for a few seconds for the paint to spread.
4. Slowly lift the cup – the paints will start to spill and create interesting shapes.
5. Slightly tilt the canvas to spread the paint evenly.
Tip: If you want to create more “cells”, blow warm air from a lighter or a hot hair dryer over the surface of the paint.
✨ Multicolored Puddles – Layering Colors
✅ Description: Pouring the paints in layers directly onto the canvas to create concentric circles or dynamic effects.
Steps:
1. Cover the canvas with a thin layer of white base. (Layer thickness 1-2 mm)
2. Start by pouring the first color of paint into two or three small puddles on the canvas.
3. On top of it, in the same puddles, pour the next color.
4. Repeat with the remaining colors – they will start to spill out in concentric circles.
5. Inflate the balloon. Gently press the balloon onto the colored puddles and carefully lift it, this will make an imprint.
6. Repeat in different places.
7. Clean the balloon frequently to get prints with fresher colors.
- Tip: You can use a thin brush or toothpick to “stretch” some colors and create additional details.
✨ Pulling Paint – Controlled Effects
✅ Description: Using household paper or plastic card to create smooth color transitions.
Steps:
1. Cover the canvas with a thin layer of white base. ( Layer thickness 1-2 mm)
2. Pour different colors of paint onto the canvas in horizontal lines, spots or freeform shapes.
3. Add a little white or black paint to one end of the canvas.
4. Using a piece of paper, carefully “pull” the paint across the canvas.
5. Watch how the colors blend, creating a soft gradient effect.
Tip: If you want more texture, add silicone oil to some of the colors before you start pulling.
✨ Color Airbrushing – Soft Airbrushing Transitions
✅ Description: A technique in which paints are spread by means of a stream of air (hair dryer, mouth air or straw).
Steps:
1. Cover the canvas with a thin layer of white base. (Layer thickness 1-2 mm)
2. Add different colors to the desired places on the canvas.
3. Use a hair dryer or blow gently on the paint to spread it in smooth wavy shapes.
4. Let the paint settle and watch how the colors mix.
Tip: This technique is ideal for creating floral or water effects.
Additional tips for better results
✨ Choose contrasting colors to emphasize the details in the composition.
✨ Do not mix the paints too much to preserve the natural shapes and shades.
✨ If bubbles appear, blow warm air from a lighter or hair dryer to remove them.
✨ Try different techniques to find your style!
✨ Experiment! Often the best paintings come from accidental spills.
Enjoy the process and create your own unique masterpiece!